 I've been developing a raging handbag fetish lately. Big bags, small bags, totes, anything with a handle sends me into shivers of ecstasy. Somehow with middle age upon me I've turned my fancy toward all things with handles.
While I was at girls camp a week ago, one of the camp leaders taught the girls to make purses from placemats and after seeing how great they turned out (I was totally coveting Grace's Asian-inspired bag with the red wooden bead handles) I decided to make one for myself.
 Trouble was, I couldn't decide which pattern I liked better so I grabbed one of each and spent a morning this week making bags--enough to satisfy even me perhaps. Maybe.
Here's the step-by-step tutorial and even if you're not a seamstress or have never made a handbag before in your life (that's me) this is so easy and goes together so well you can't go wrong. If you make one, post a picture of it because I'd love to see what others come up with.
Oh, and by the way, I ordered a bag from Lisa Lam over at U-handblog last week and word is it's done and on it's way across the Atlantic to my waiting arms. I'll have to post pictures when it gets here . . .
 Materials:
* One rectangular placemat (I got mine at Fred Meyer, lighter weights are easier to sew but any rectangular mat will do). No notched or angled corners.
* 28 inches of 1-inch wide grosgrain ribbon in a color that matches the place mat.
* clear nylon quilting thread
* 1 set of purse handles (I got mine at Joann Fabrics for $2.77)
 Step 1:
Measure out a 7-inch length of ribbon and lay it on the shorter side of the placemat, four inches from edge on what will be the outside of your purse. Though most place mats are reversible be sure to place the ribbon on the "right" side or outside. See the first photograph where I'm measuring distance.
 Step 2:
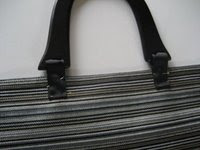
Pin the ribbon in an upward direction, fold it down, thread one side of the wooden handle onto the ribbon and then fold the ribbon upward one more time. This may seem confusing but all you're trying to do is sew the end of the ribbon onto what will be the top outer edge of your purse and to have the end of the ribbon tucked in so it won't fray. There isn't a perfect way to do this but as long as you know what you're trying to do you can come up with another way of doing it if you wish. This is the trickiest part.
 Step 3:
Sew a rectangle around the end of the ribbon where it will attach to the purse. You could sew an x pattern as well but I used a rectangle. Repeat steps 1 and 2 for the other side of the handle then repeat the whole process for the second handle on the opposite edge of the placemat. See the second photograph for the finished handle.
Step 4:
Fold the placemat in half, with the handles meeting and the "wrong" side (or inside of your future purse) showing. Stitch 1/4 inch seam allowance down the sides, starting at the top and working down to ensure that the top edges meet exactly. You will not need to finish any seams because the place mat edges are already finished.
 Step 5:
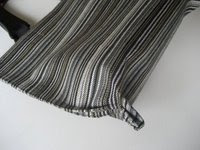
With the wrong side still showing, open the purse and lay the corners flat so that they form a triangle. With the seam opened flat, sew across the corner at a distance of 1 1/2 inches from the point, about where my thumb is in photograph three. Photograph four shows what the corner should look like once it's sewn, rather squashed flat. Repeat on the second corner then turn the bag right side out.
No ironing, no finishing, it's done and ready to go! The top two pictures show two other bags I did and I like the one on the right the best. Not only was the thinner placemat easier to sew but with the border and sheen to the fabric it looks sleek and finished and the Asian wood beads on the handle are match perfectly. Lillian wants me to make her a pink one now.
***
Using my Custom Search Engine (see the search bar at the top of my sidebar) I found some other sites on the subject:
* Amy's Favorites has a tutorial and a different way of tackling the project (and she uses the placemat I have for our table, go figure!)
* The Monkey Basket has instructions for a basket-bottomed purse.
* Crafty Chica with her pre-lined placemat purses
* Stardust Shoes has a funky-handled bag and a placemat with great fabric
Technorati tags: handbags, crafts, purses, sewing

41 comments:
Thats a cute purse! I like yours and the red striped one on the top.
I am going to have to try this out sometime. Looks like something my sisters, Mom and I could do for a Girl's Night out project.
These are adorable...now I need to find some snazzy placemats :)
Okay...those are cool...and it's rekindling a fetish for handbags that I thought I'd lost! I don't know if I could make them though...I'm sewing-challenged...perhaps I should look for something similar in the stores :o)
I love, love, love handbags and purses too!!! And yours is cute!
I've seen this done before and I can't believe how great they look. I may have to try it myself!
Thanks so much for posting this. The bags look great, so long as it is easy enough to find a place with the handles.
What do you think about how this could be done with a zipper across near the top somehow? I am thinking about the Lands End tote bags and how they come in an open style and also a style with a zip.
Tracy
I've never sewn anything in my life, but as I have a handbag fetish and I really like the look of these, I might be tempted to give it a go.
Fun purses! This makes me want to create one for myself. Photos and instructions are great.
very adorable!!! I love it! I will try it as soon as I find some adorable placemats.
Ooh, I need one of these. And I definitely hope I can put a zipper in it seeing how I am such a klutz when I'm shopping.
I am trying this ASAP! I am a 'bag lady' too and I especially love bags I can make myself! Great idea!
Very cute! My step-niece made some placemat purses a few years ago around Christmas. She made them out of placemats and old neckties. They were really cute too.
Cute! Have you heard of the company that makes handbags out of old billboard vinyl? It's such a "green" concept.
I would think a zipper would be hard to put into one that was as thick as the top red striped one is or the one in the tutorial. You could probably put something like a snap or other style of closure device on it. Maybe even a gromit on either side and a leather lace. I suppose it depends on the style and how inventive you are.
These are really fun. I've seen so many cute ones, and yours are fab, too!
Get your speech prepared because I've nominated you for the Reflection Blogger Award. Stop by when you get a sec!
Ooooo that is AWESOME!
Those are awesome!!
I love these! Very cool!
I share your fetish -- I'm always in search of the perfect purse with just the right arrangement of compartments for efficient, easy access.
I think I'll give this pattern a try. Thanks.
You are so AMAZINGLY crafty. So inspiring! Great purse!!!!
Those totally don't look like they were made with placemats.
Thanks for this. What a great idea. I love it! With so many placemats to choose from the styles are endless. I like the price too! :)
Although I have no interest in doing this, it's quite fun to read and look at.
My mother was incredible with sewing and anything related. She made almost all of her own clothes, mine and my brother's shirts, and my sisters clothes when we were growing up. It comforting to see the people still like to make things of their own.
Very clever. I love it!
I'm almost tempted to dig and and dust off the sewing machine - or I would do if I didn't have to go and buy the placemats first - I think our current set are a bit too stains to be recycled in this manner.
Cheers
Great purse, thanks for sharing how to make them!
I have this same fettish with shoes. :)
This is great! My non-crafty self might even have to try this!
I would never have thought to use a placemat to make a purse ~ GREAT idea, and FANTASTIC job!
You weren't the only one making a bag ;-)
PS - Have you ever looked at www.bykimlane.com for bags? I have three of her products and have given a few as gifts - LOVE HER!!
Beautiful! Thanks for the tutorial tips! I too have become handbag crazy -- maybe it's from all the summer heat!
Never occurred to me that you could use a placemat for to make a purse. You are a genius!
Um... I have a real thing for bags too. Love. Them.
Love this project too, but alas, have no sewing machine and no Joann's to buy purse handles from. Ah, me. I could keep myself in handbag heaven...
how cute I cannot wait to make one.
I absolutely LOVE this. Very cool. I am definately going to give this project a try. TFS
You, MADE, these! Just lovely. And just the bags I love.
Genius!
That is a cool craft, and I'm sure the young women at my church will love it, but how did you do that at camp? Did you have electricity for sewing machines? I'm doing this one, I'll let you know when I post it.
that is a great idea!! I'm going to try this one!! Thanks
I am hopeless at sewing but you make me want to learn!
Have you not considered opening an etsy shop? These are luscious!
Thanks for such a clear tutorial!! I "googled" placemat bag and found your blog ... your directions and pics were so clear and plain I made my first bag this evening and LOVE it !!!!!!!! :)
Thanks again!
Post a Comment